The Best Whole Wheat Sourdough Sandwich Bread
This post may contain affiliate links. Read disclosure policy.
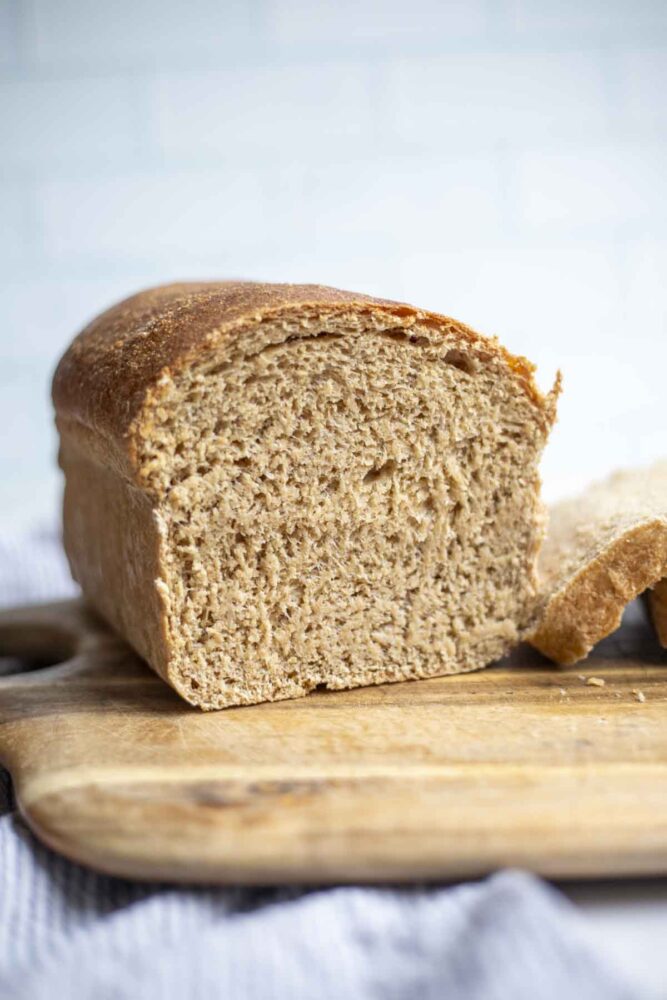

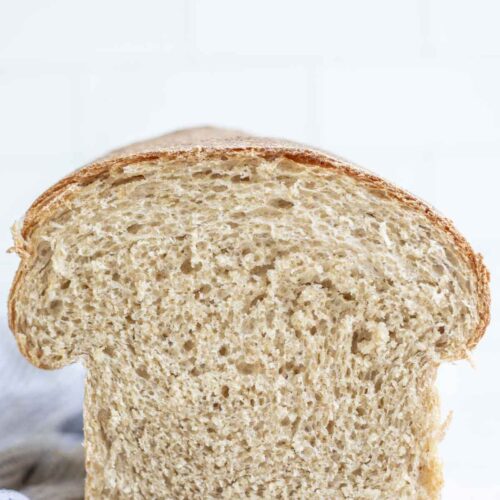
The best whole wheat sourdough sandwich bread recipe combines the nutty, rich flavor of whole wheat with the naturally tangy bite of sourdough, a light airy crumb, and chewy texture. Perfect for sandwiches, toast with jam, as a side, or just a snack.
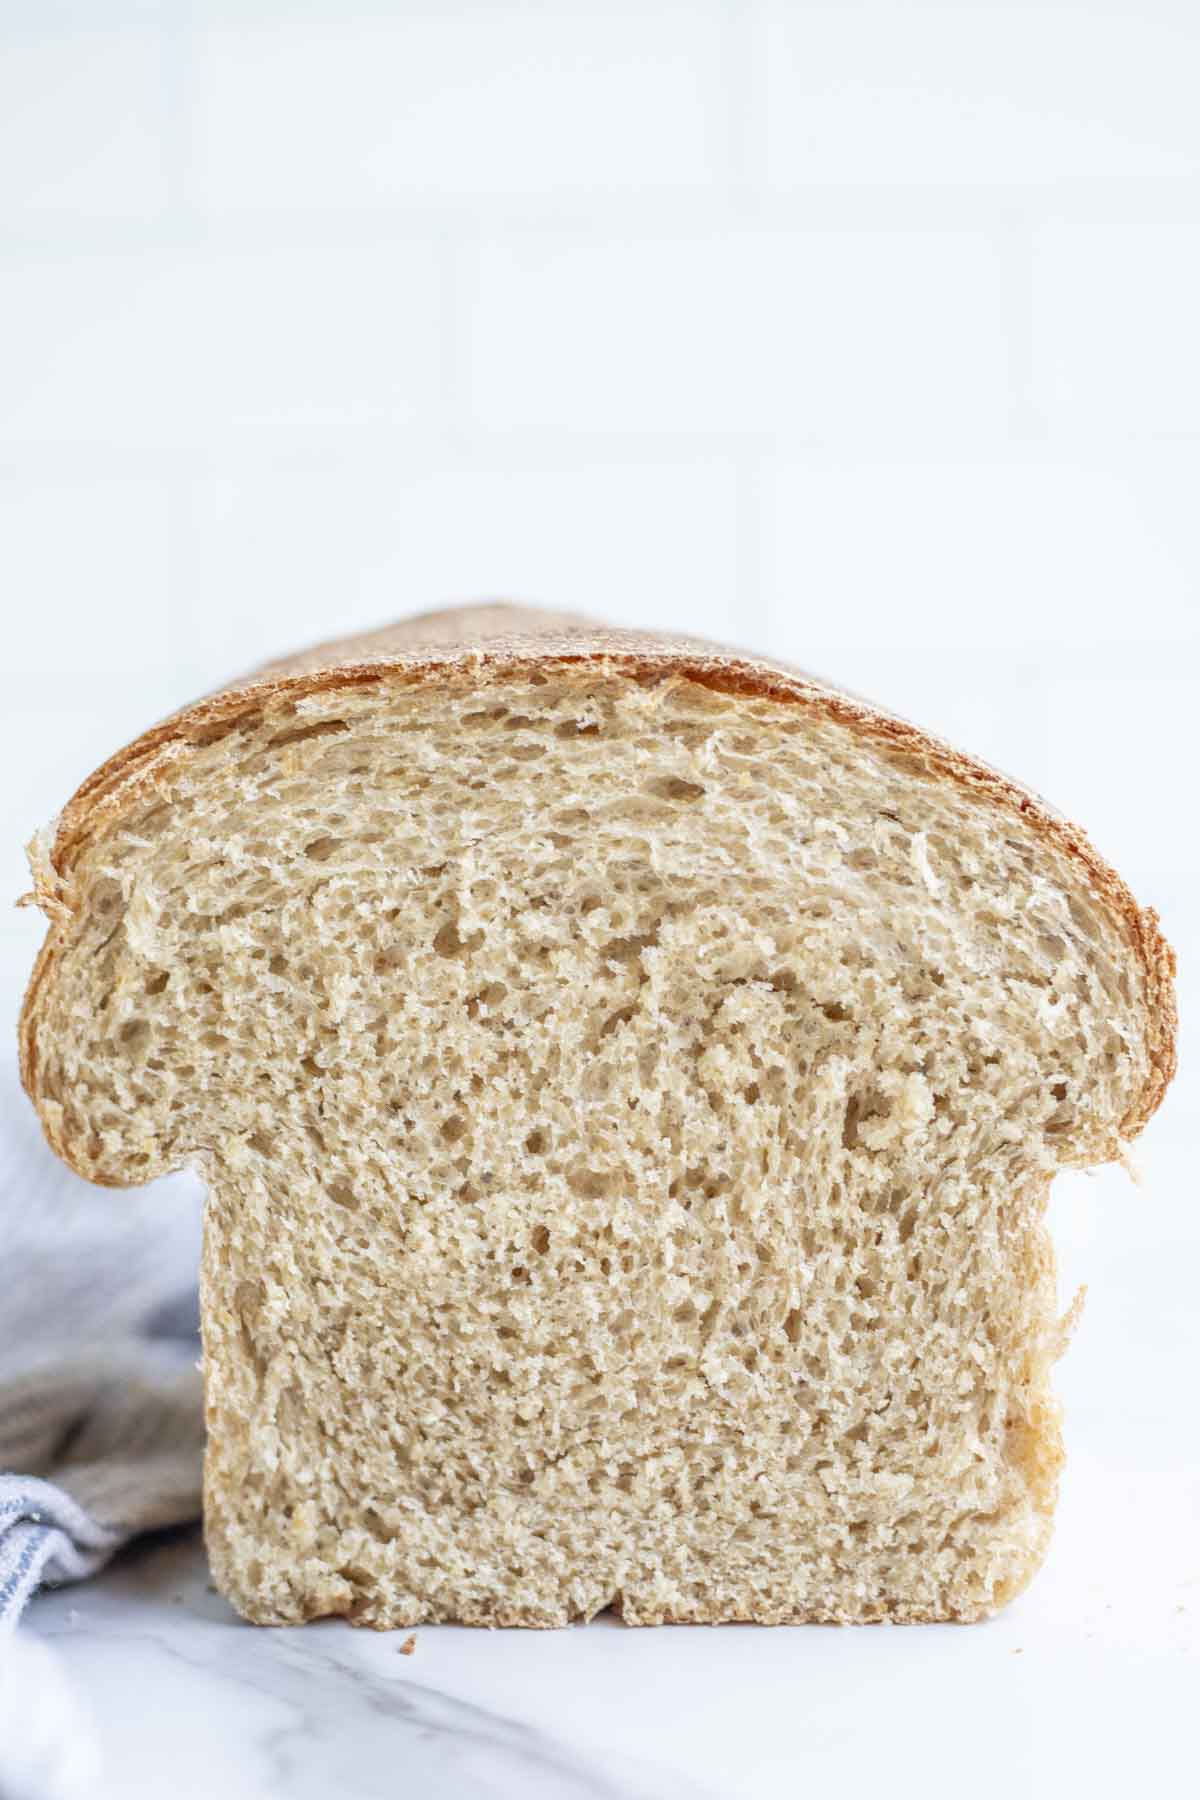
Whole wheat sourdough sandwich bread made from freshly milled flour not only tastes amazing, but also brings a depth of nutrition and flavor you can’t get from store-bought bread. It has the softest, most incredible texture, and is really easy.
If you are new to using fresh flour, this recipe is for you. No weird steps or preparation. I tried to make it as simple as possible.
As a busy mom with limited time, I need nutritionally dense recipes that are simple and take very little hands on time. You will rarely ever find me standing over a bowl doing stretch and folds (although you could if you do not have a stand mixer. If you are looking for a super simple crusty loaf, try my easy sourdough bread for beginners.
It’s the perfect soft sourdough sandwich bread, toasted with a little butter, or simply enjoyed with a bit of strawberry chia jam.
Why You Will Love This Recipe
Healthier Option: Whole grains provides more fiber, vitamins, and minerals than white flour, making this bread a nutritious choice.
Superior Flavor: Freshly milled wheat flour brings out more natural sweetness and complexity compared to store-bought flour. Better than any bread you will find at the grocery store.
Simple Ingredients: With just a few ingredients, this bread is easy to make without any weird ingredients.
Easy: I’m not one to remember to take out my butter to let it soften, so I wanted to create a super easy recipe that wouldn’t really need much prep work. As long as you have an active starter you are ready to go.
Flexible: One of my favorite things about sourdough bread is that you can pause it at any time. If I run out of time to shape the dough, I will just pop it into the fridge for a few hours until I get time. Same with the bulk fermentation.
Why Use Fresh Milled Wheat?
Freshly milled wheat flour gives your bread better flavor and nutritional profile. When you mill wheat at home, you retain the bran, germ, and endosperm, which are typically lost in refined flour.
This means more fiber, protein, and essential vitamins, like B vitamins and vitamin E. Freshly milled flour also has a natural sweetness and nutty flavor that store-bought flour can’t match.
As soon as it is milled it starts to lose some of those nutrients. Some sources say that about 45% of nutrients is lost within 24 hours of milling and 90% after 3 days.
If you’ve never tried baking with freshly milled flour, you’ll be amazed by the difference it makes in your bread. Learn more about the health benefits of fresh milled flour here.
Ingredients

Whole wheat flour: I use freshly milled hard white wheat berries.
Water: Room temperature. As long as it is not too hot that it will kill the yeast in the sourdough starter.
Active sourdough starter (100% hydration): This is a starter that has been recently been fed with flour and water and allowed to double (or about double) in size. This can take anywhere from 4-12 hours depending on your starter and the environment.
Sugar: or another sweetener of your choice. If you use maple syrup or honey, you will probably need to adjust the amount of water added.
Olive oil: Melted butter would also work.
Tools Needed
Grain mill: I have a Mockmill. I know many people the use and love the Nutrimill.
Hard White Wheat: I love to purchase my wheat through Azure Standard. I have found them to have the best prices.
Kitchen scale: For accurate measurements, particularly when working with fresh milled flour.
Save This Recipe
Stand mixer with dough hook attachment or a large mixing bowl.
Dough scraper: Helpful for shaping the dough and handling during the kneading process.
Loaf pan: Mine is a 9 1/4″ by 5″
How to Make Whole Wheat Sourdough Sandwich Bread
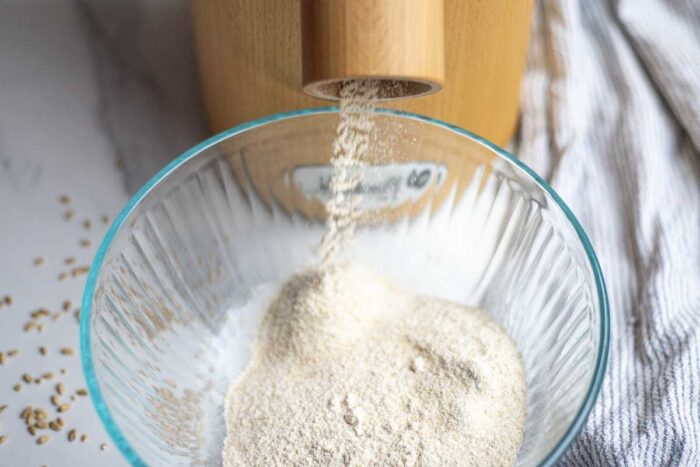
Step 1: Mill the flour. I use my Mockmill to mill hard white wheat berries.
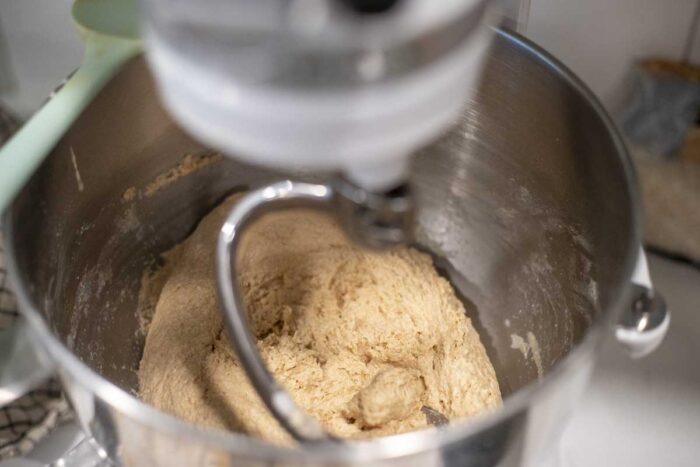
Step 2: Autolyse the dough by combining all of the ingredients in a bowl of a stand mixer or a large bowl. Mix until fully hydrated and there are no dry spots. Cover and let it sit for about 30 minutes to 1 hour. This step helps hydrate the flour which helps start gluten development, improving the bread’s texture.
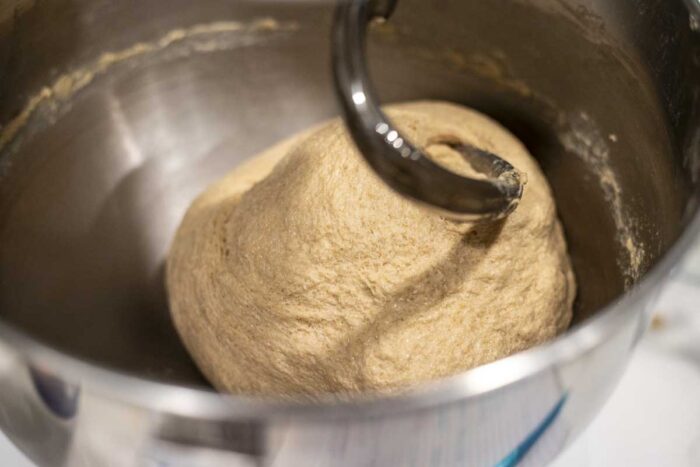
Step 3: Knead the dough by hand or using a stand mixer for anywhere from 10-30 minutes until it becomes smooth and elastic. It should be able to stretch pretty thin without breaking. This dough is on the more hydrated side so you may need to grease or wet hands to work with the dough. If kneading by hand, you can use the “stretch and fold” technique. Stretch and fold the dough 30 minutes apart at least 3-6 times.
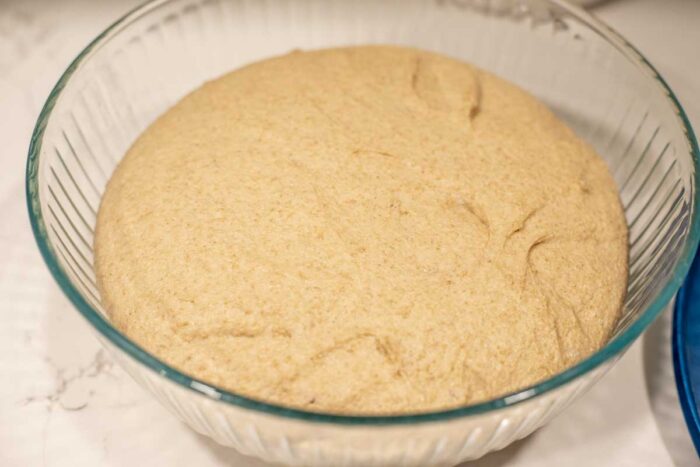
Step 4: Bulk Fermentation. Cover the bread dough with a damp towel or plastic wrap and let the dough rest in a warm place for 4-6 hours possibly up to 12 depending on how warm your house is. It should double in size.
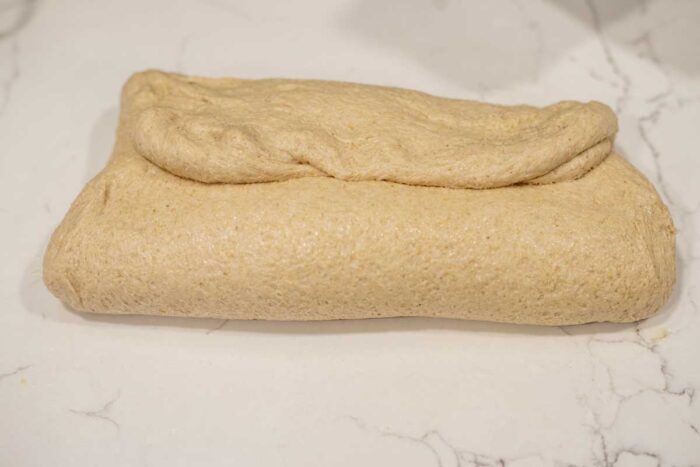
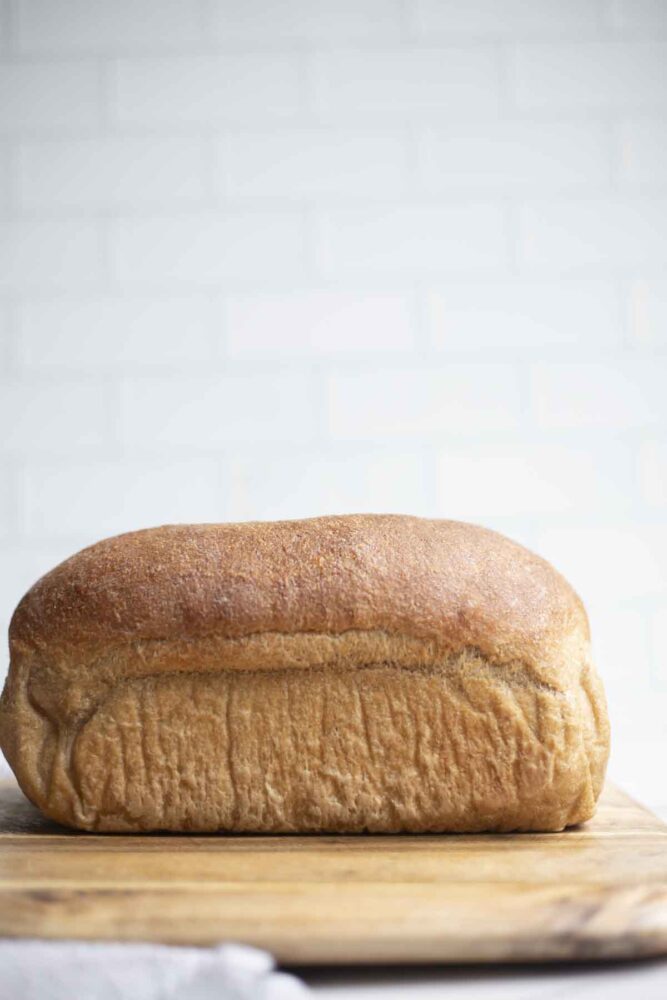
Step 5: Shape the Dough. Once the dough has risen, gently turn it out onto an oiled surface. Shape it into a loaf by patting out into a rectangle, fold the edges into the middle, and then rolling up tightly. I like to also create tension by dragging the dough towards me while I am rolling it up.
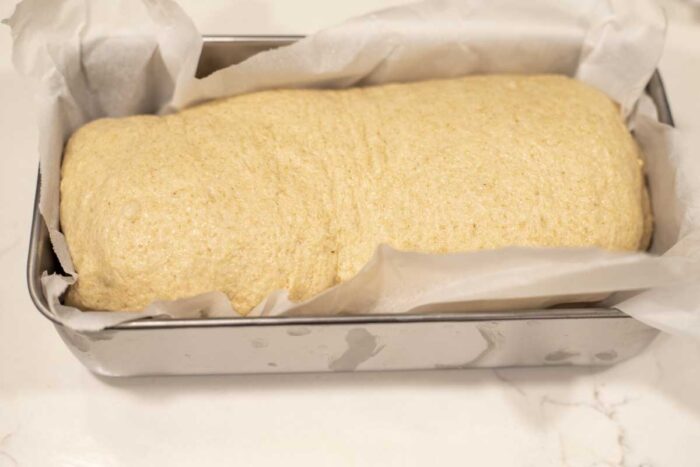
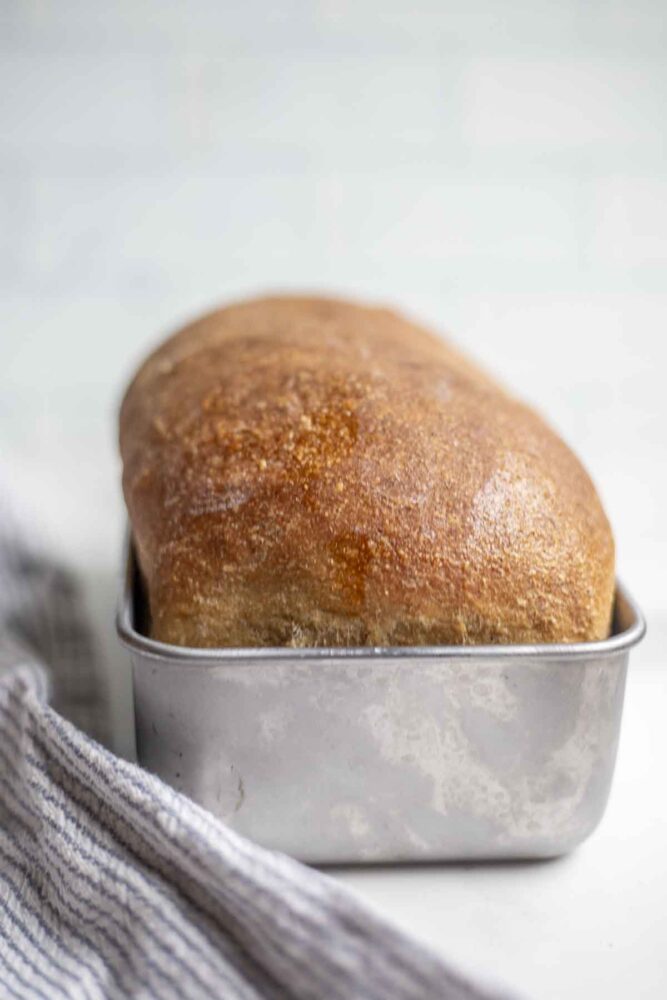
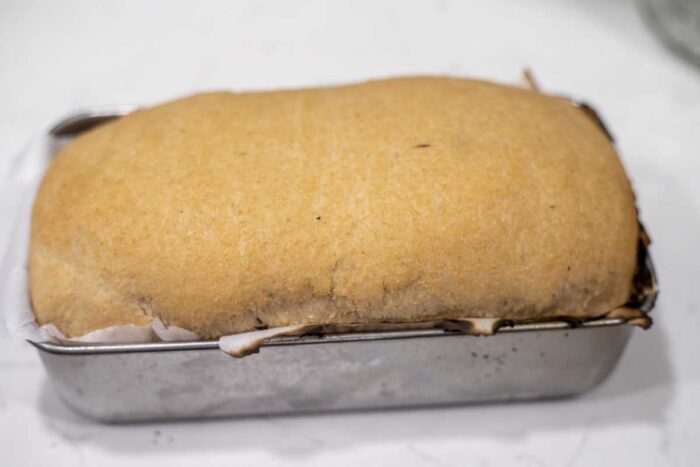
Step 6: Place the shaped dough into a parchment lined or greased loaf pan. Let the dough rise for 1-2 hours or until about doubled. Or place in the fridge, covered with plastic for 15 hours.
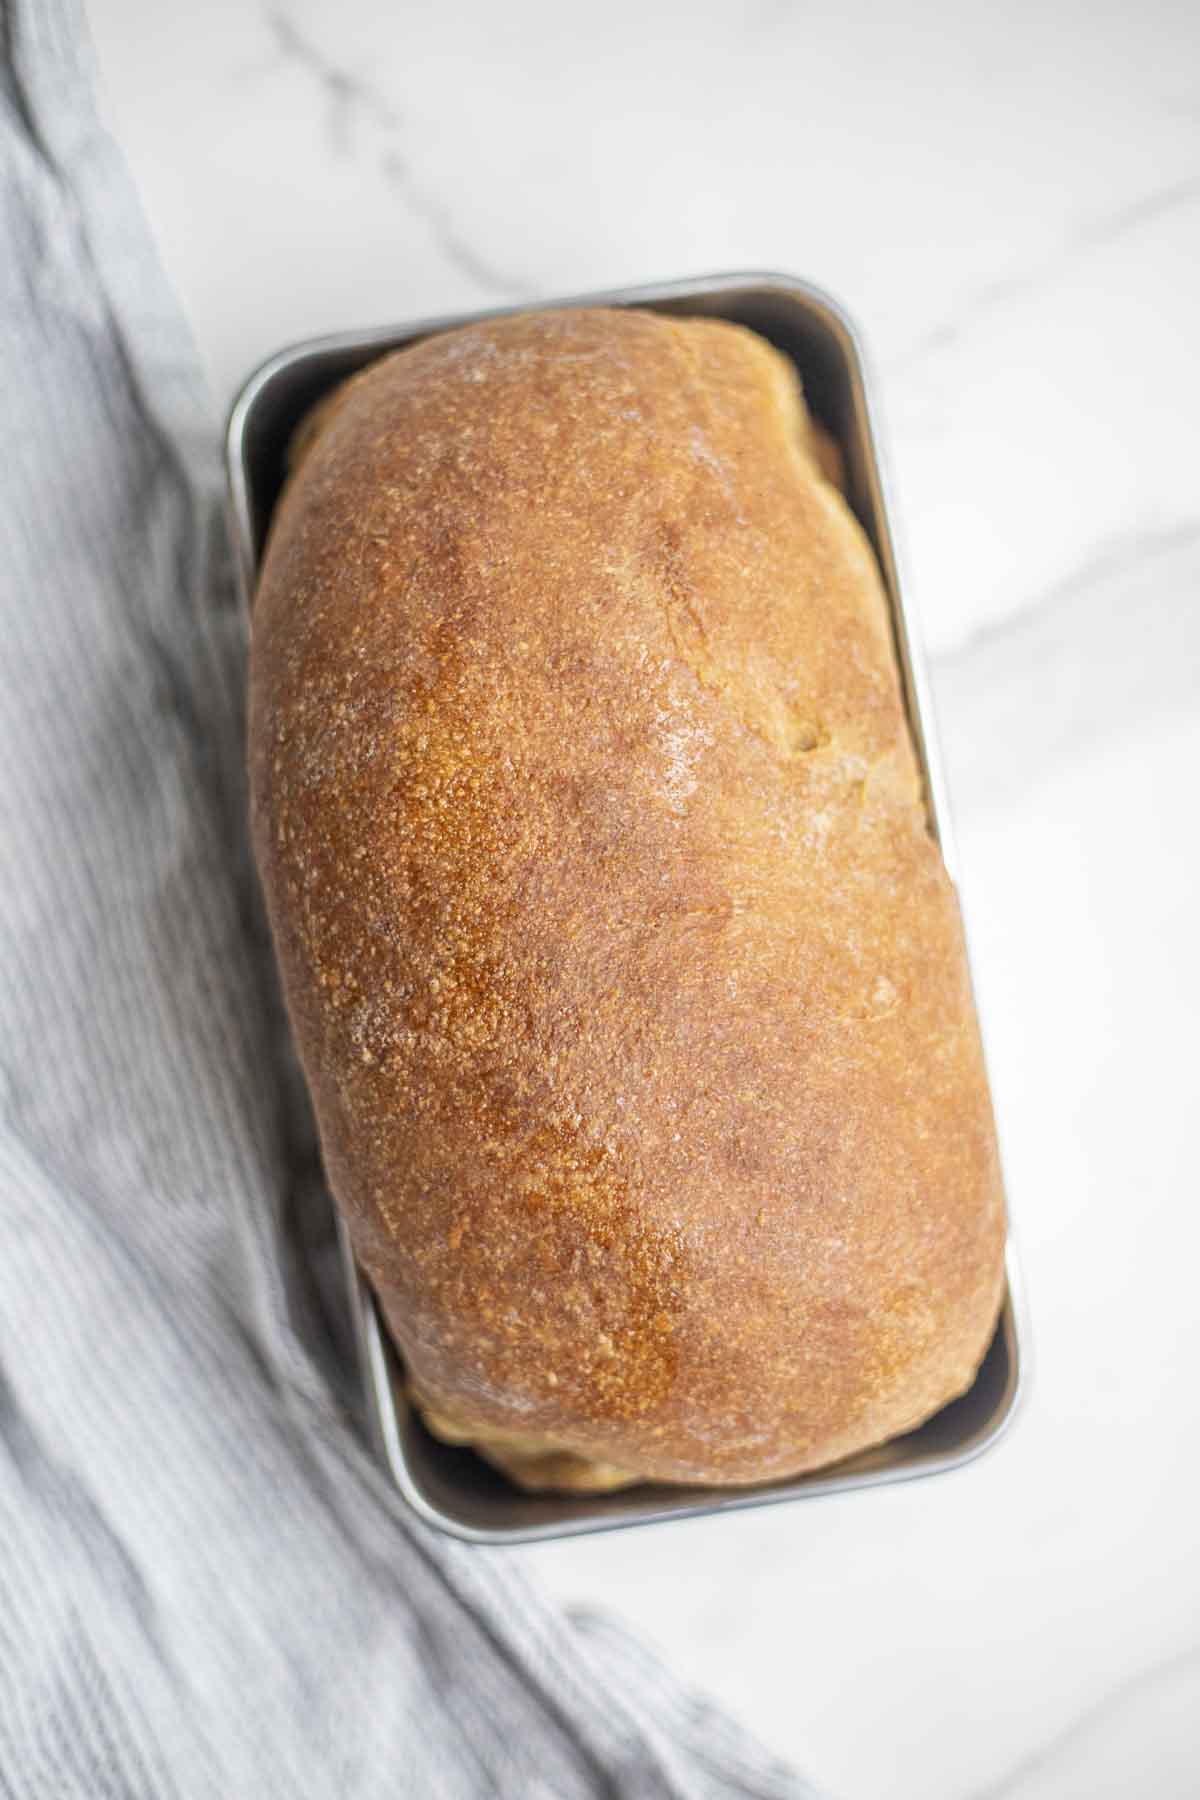
Step 7: Preheat the oven to 375°F. Bake for 40-45 minutes or until an internal temperature hits 190-210°F. Optional: for a more golden brown color, brush on an egg wash to the top of the dough.
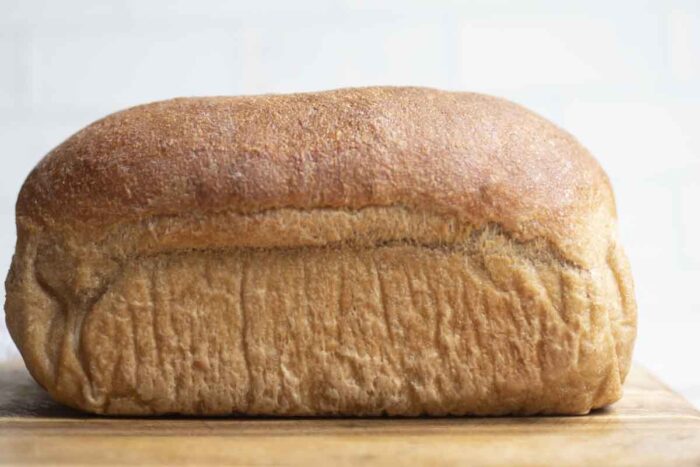
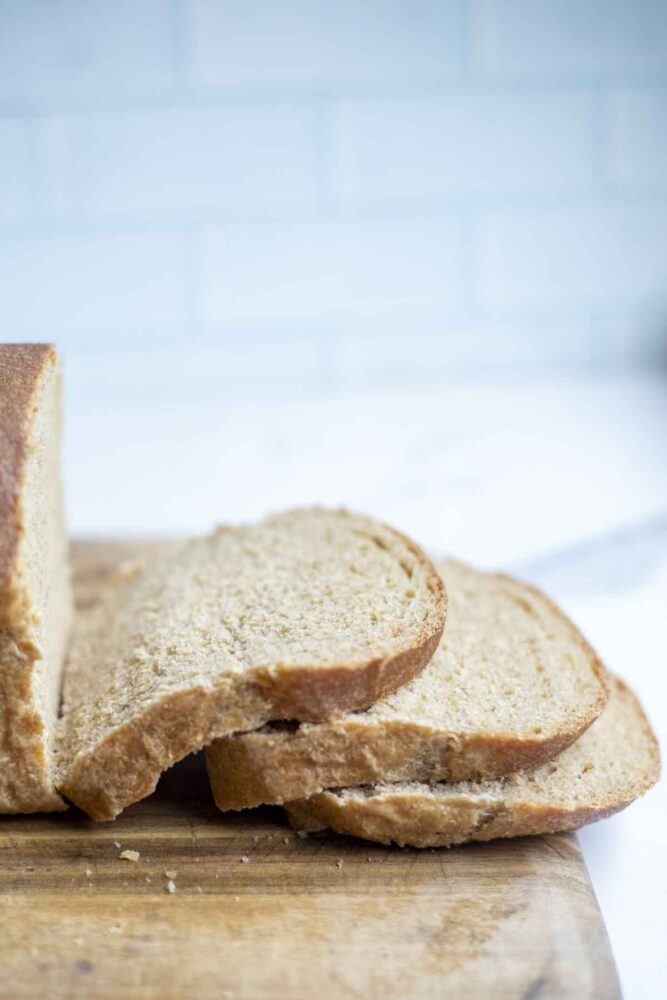
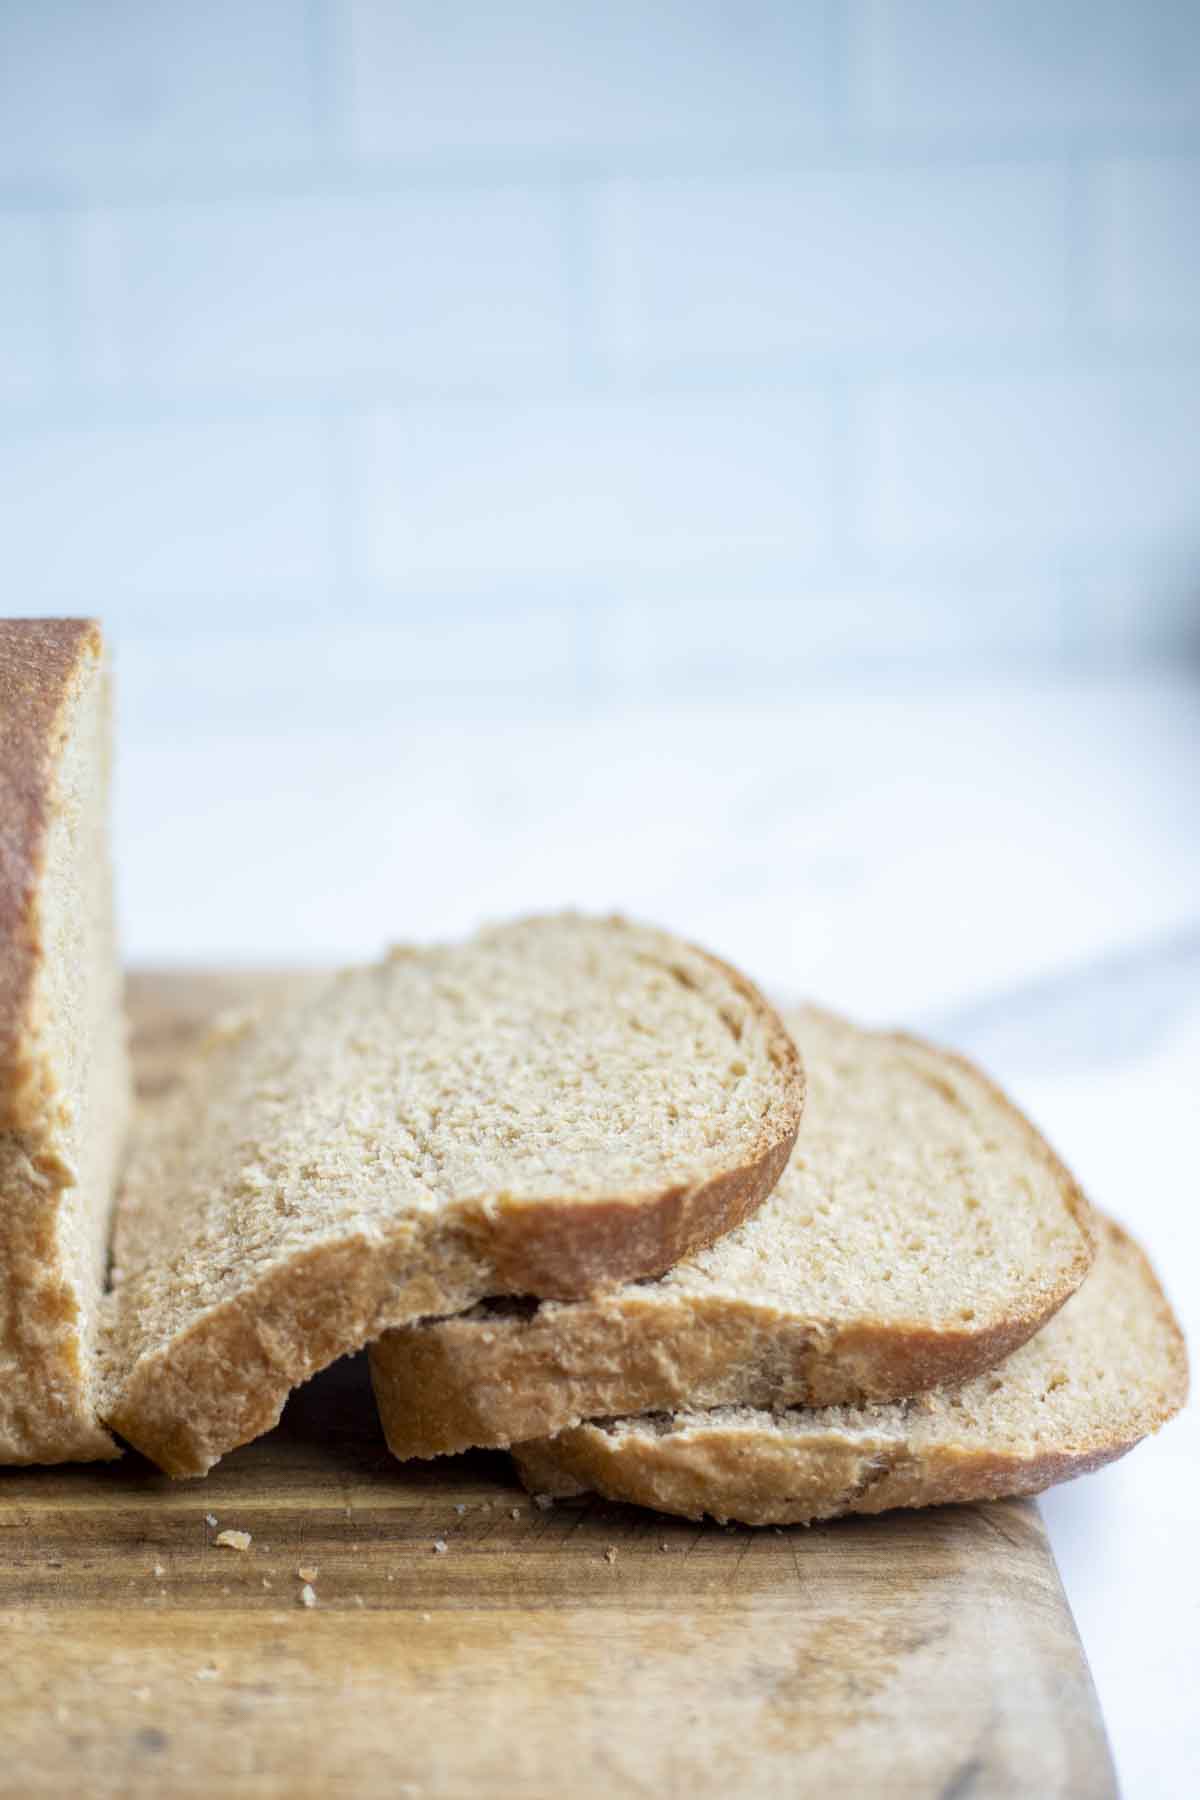
Step 8: Remove the sandwich loaf from the oven and let it cool on a wire rack for at least 30 minutes before slicing. Cutting into the bread while it’s still hot may cause it to become gummy inside.
Tips for Success
- Whole wheat flour absorbs more water than white flour, so you may need to adjust the hydration of the dough especially if you use a different type of wheat. If the dough feels too dry, add a little more water, a tablespoon at a time.
- Depending on the hydration of your starter may determine how much liquid you need to add. If you have a more liquid starter, you may to add a little more flour and vise versa.
- If you’re using a sourdough starter, make sure it’s active and bubbly before using it in the recipe. Feed it at least 4-12 hours before baking for best results. I have tried it with discard. It does work, but it doesn’t get as fluffy compared to active starter.
- Sourdough is all about slow fermentation. Allow the dough to rise at its own pace, and don’t rush the process. The long fermentation times are what give sourdough its signature flavor and texture.
- Rise times are based on a lot of different factors and fresh milled wheat may ferment faster than bread made with all-purpose or bread flour. At any point you would like to “pause” your bread, you can stick it in the fridge. Make sure to cover it with a lid or a bag. Something air tight to prevent drying out.
- The trickiest part of this recipe, and all sourdough breads, is just getting the timing right. Not over-proofing or under-proofing. It takes time and practice.
Storage
Whole wheat sourdough bread is best eaten within 3-4 days. Store it in a paper bag or wrapped in a clean towel at room temperature.
If you want to keep it fresh longer, freeze whole or slice the loaf and freeze the slices in a ziplock bag. This way, you can toast individual slices as needed.
FAQ
Yes, you can. However, freshly milled flour will provide a richer flavor and more nutrients, making the bread taste better and healthier.
Your starter should be bubbly and doubled in size within 6-12 hours of feeding. Mark the starting point of the starter right after it is fed so you can see when it has doubled. It should also pass the “float test”: take a small spoonful of starter and place it in water—if it floats, it’s ready to use.
For breads, it is recommended to use hard white or hard red wheat berries. You can also experiment with mixing in other types of wheat berries like kamut or spelt. I have only ever tried this recipe with hard white. Einkorn will not work well for this recipe.
Baker’s Timeline
Day 1 9 AM: Feed sourdough starter.
Day 1 9 PM Could be sooner or later: Mix and knead dough, followed by bulk fermentation (6-12 hours). I like to mix my bread in the evening and let it bulk ferment overnight.
Day 2 8 AM: The next day, shape dough, proof for 1-2 hours.
Day 2 10 AM: Preheat oven, bake, and cool. Enjoy
Find more delicious sourdough recipes:
- Sourdough Peach Cobbler
- Sourdough Oatmeal Cookies
- Easy Sourdough Bread For Beginners
- Sourdough Discard Bread
If you try this recipe and love it, I would love if you could come back, comment on the post, and give it 5 stars! Please and thank you. Tag me on Instagram @ablossominglife.
Whole Wheat Sourdough Sandwich Bread
Save This Recipe
Equipment
Ingredients
- 550 g fresh milled hard white wheat 4 cup + 2ish tablespoons
- 135 g active sourdough starter little less than 2/3 cup
- 370 g water a little over 1 3/4 cup
- 50 g olive oil about 1/4 cup
- 22 g sugar 2 tablespoons
- 10 g salt
Instructions
- Mill the hard white wheat berries into flour.
- Autolyse the dough by combining all of the ingredients in a bowl of a stand mixer or a large bowl. Mix until fully hydrated and there are no dry spots. Cover and let it sit for about 30 minutes to 1 hour.
- Knead the dough by hand or using a stand mixer for anywhere from 10-30 minutes until it becomes smooth and elastic. It should be able to stretch pretty thin without breaking. This dough is on the more hydrated side so you may need to grease or wet hands to work with the dough. If kneading by hand, you can use the “stretch and fold” technique. Stretch and fold the dough 30 minutes apart at least 3-6 times.
- Bulk Fermentation. Cover the bread dough with a damp towel or plastic wrap and let the dough rest in a warm place for 4-6 hours possibly up to 12 depending on how warm your house is. It should double in size.
- Shape the Dough. Once the dough has risen, gently turn it out onto an oiled surface. Shape it into a loaf by patting out into a rectangle, fold the edges into the middle, and then rolling up tightly. I like to also create tension by dragging the dough towards me.
- Place the shaped dough into a parchment lined or greased loaf pan. Let the dough rise for 1-2 hours or until about doubled. Or place in the fridge, covered with plastic for 15 hours.
- Preheat the oven to 375°F.
- Bake for 40-45 minutes or until an eternal temperature hits 190-210°F.
- Optional: for a more golden brown color, brush on an egg wash to the top of the dough.
- Remove the bread from the oven and let it cool on a wire rack for at least 30 minutes before slicing. Cutting into the bread while it’s still hot may cause it to become gummy inside.
Notes
- Whole wheat flour absorbs more water than white flour, so you may need to adjust the hydration of the dough especially if you use a different type of wheat. If the dough feels too dry, add a little more water, a tablespoon at a time.
- Depending on the hydration of your starter may determine how much liquid you need to add. If you have a more liquid starter, you may to add a little more flour and vise versa.
- If you’re using a sourdough starter, make sure it’s active and bubbly before using it in the recipe. Feed it at least 4-12 hours before baking for best results. I have tried it with discard. It does work, but it doesn’t get as fluffy compared to active starter.
- Sourdough is all about slow fermentation. Allow the dough to rise at its own pace, and don’t rush the process. The long fermentation times are what give sourdough its signature flavor and texture.
- Rise times are based on a lot of different factors and fresh milled wheat may ferment faster than bread made with all-purpose or bread flour. At any point you would like to “pause” your bread, you can stick it in the fridge. Make sure to cover it with a lid or a bag. Something air tight to prevent drying out.
- The trickiest part of this recipe, and all sourdough breads, is just getting the timing right. Not over-proofing or under-proofing. It takes time and practice.
- Substitute olive oil for a different oil or melted butter.