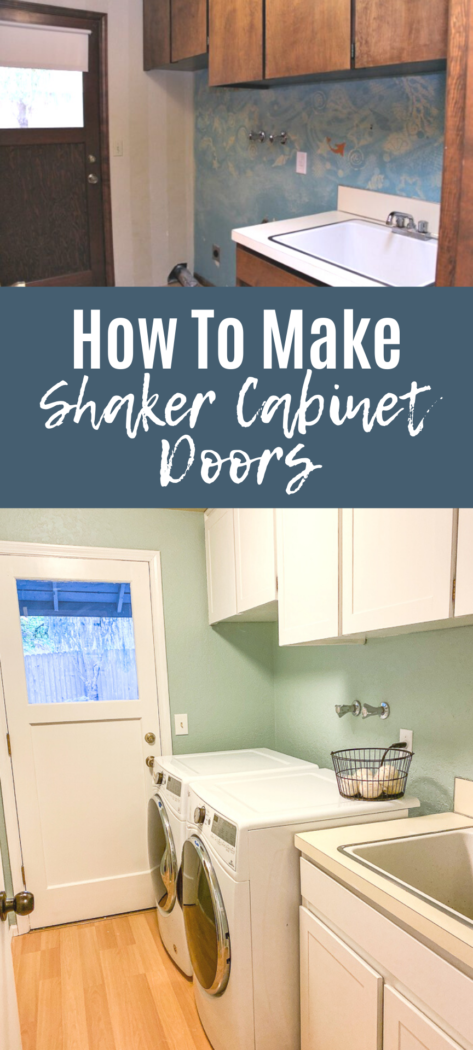
How To Make Shaker Cabinet Doors From Flat Paneled Doors
This post may contain affiliate links. Read disclosure policy.
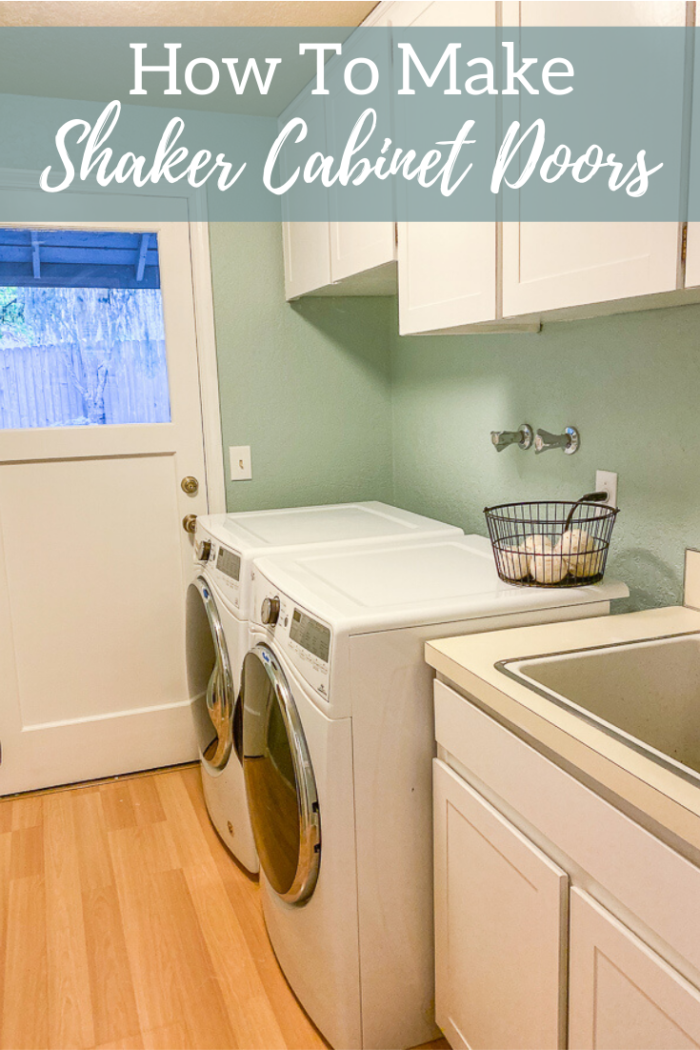
Learn how to make shaker cabinet doors from flat-paneled doors in this easy, step-by-step tutorial. Give your outdated cabinets a new and refreshed look by adding simple molding.
Y’all, I’m so excited to share this really simple tutorial with you!
Woodworking has been so intimidating to me, and every time I come up with an idea, I hear “that will be too hard.” Like when I built this DIY fireplace mantel.
Guess what? This project was pretty darn simple; it took some time, but the results are amazing.
To really see the impact, take a look at the before picture of our laundry room! You can find the before tour of our 1970’s house here.
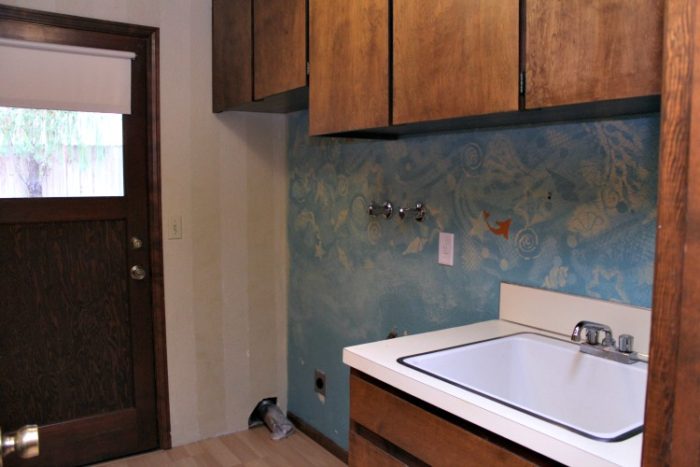
Even though the shark, seaweed, and starfish stencil was AMAZING… one of the first things I did was paint over it.
But then I stared at the outdated and dark flat-paneled cabinets for over a year and a half, trying to gain the confidence to try to change them.
Finally mustering up my courage, I took the plunge, and did it!! It was a little time-consuming but not at all difficult, and the results were 100% worth it.
You can totally do it yourself!
How To Make Shaker Cabinet Doors Tips:
- Have all your tools and supplies ready so you don’t have to make a million trips to the store.
- A paint sprayer gives you a professional finish. It can be done with a foam roller, but the cheap paint sprayer I bought was totally worth it. I’ve used it for so many projects.
- It helps to work in a well-ventilated place that you don’t mind getting messy (and by messy, I mean you might have some slight over spray). A garage worked perfectly for us.
- Make sure to completely cover any place you don’t want painted with drop clothes.
- Rip extra wood molding, just in case you made a mistake. I was thankful for the many extra pieces I had.
The following are affiliate links. We are a participant in the Amazon Services LLC Associates Program, an affiliate advertising program designed to provide a means for us to earn fees by linking to Amazon.com and affiliated sites.
Tools you will need:
I borrowed some of these, used what we had, and purchased one new tool.
Table saw – I had a friend rip all the wood into strips
Ryobi Brad Nailer + nails – I purchased this compressor-free one and love it. Make sure the nails are long enough, but not so long that they go all the way through your doors.
Miter Saw – We have one similar to this one.
Wood glue – this is my favorite.
Save This Recipe
Wood filler
Wood: 1/4″ plywood or MDF cut into 2 1/4 inch strips. I accidentally used .27mm thick plywood because it was labeled wrong. It worked perfectly though.
Electric Sander – I love this inexpensive one.
Sand Paper – I used 150 grit to give it a good sanding and to sand down the edges before painting. Remember that high grit is more fine and low grit is more coarse (and takes out more material). Use the coarse to remove the finish off the original cabinets.
Primer – I like this one.
Paint- I used Behr Swiss Coffee in Semi Gloss. Already had it on hand making this project a lot cheaper.
Paint sprayer – I have the older version of this one and it has been well worth it.
Drop cloths
Paint brush and foam roller
Paper towel or cloth – for cleaning off the sanded wood.
Find more of my favorite DIY projects:
- How To Paint Trim The Proper Way
- Build A Fireplace Mantel – Easy DIY
- How To Paint Fireplace Tile – DIY Fireplace Makeover
- DIY Blanket Ladder – Simple Home Decor Project
- DIY Stenciled Flowers Wall – Farmhouse Girl Room Reveal
How To Make Shaker Cabinet Doors Video Tutorial
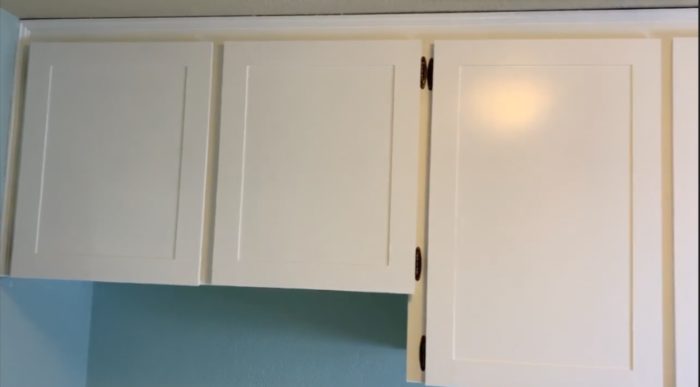
How To Make Shaker Cabinet Doors From Flat Paneled Doors
Prep Original Doors And Grab Materials
- Label doors and their coordinating cabinets with numbers. I used painter’s tape and a sharpie marker. First door got a 1 as well as the base cabinet.
- Remove doors from the cabinets and remove all hardware.
- Using electric sander, sand the doors front and back. You’re not trying to sand off all the finish; you just want to make sure you are taking off any shine so the paint will stick well.
- Patch any holes needed. Allow to dry, then sand.
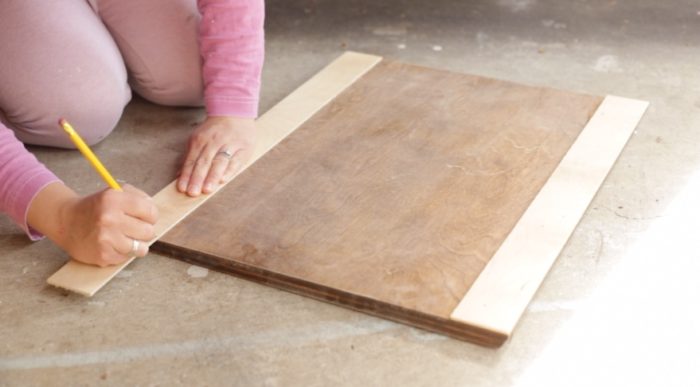
- Rip wood strips to 2 1/4 inch-thick strips.
Creating The Shaker Style Door
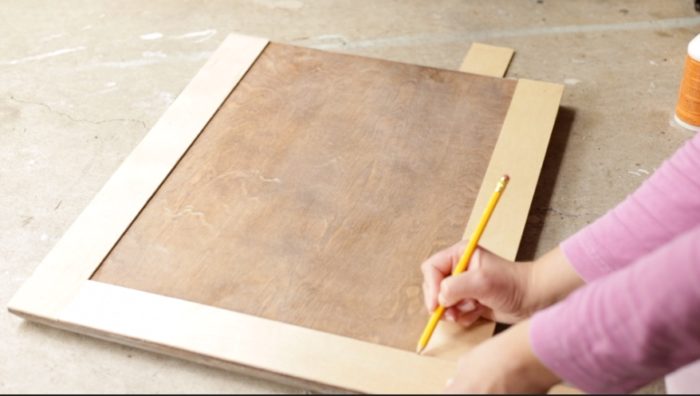
- Measure the longest part of the first door and cut two pieces of your ripped wood that length. Check to make sure that the wood is the correct length and the edges are totally flush on all sides.

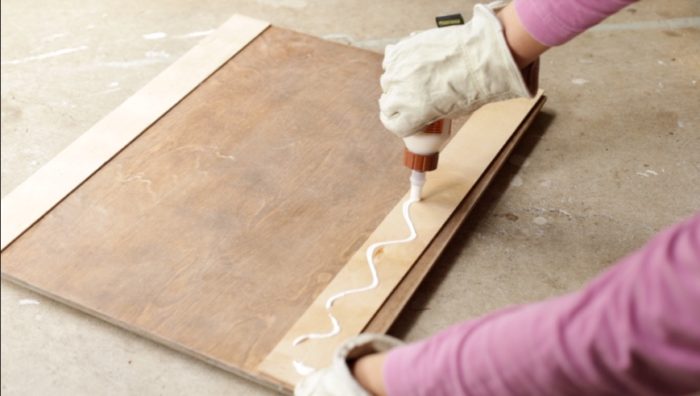
- Take the wood and apply wood glue to one side, then place glue side down on the cabinet, and make sure all the edges are lined up flush on all the sides (top, bottom, and long edge).

- Once lined up correctly, use nail gun to add nails. I added 2-4 nails, depending on the side.

- Follow same steps on the other long side.
- Now that the two long sides are complete, measure the space between the two pieces of trim and cut wood that length.
- Check to make sure it fits snugly and there isn’t too large of a gap on either side. It should be pretty snug.
- Apply glue to one side and place that side down.
- Adjust wood until perfectly flush with the edge. Nail into place.
- Do the same on the opposite side.
- Allow the glue to dry.

Prep For Painting:
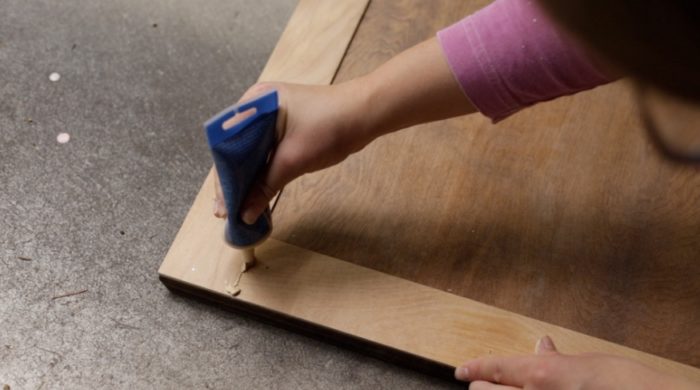
- Make sure all the nails are flush with the wood. If not, use a hammer and nail them down.
- Fill any gaps or nail holes with wood filler, scraping off the access. Allow to dry.

- Using 150-grit sandpaper, sand the wood filler until flush with the wood. Give the doors a nice sanding, sanding down all the edges to make sure they are nice and smooth.
- Wipe doors clean with a damp rag or paper towels. Allow to dry.
- Sand down and wipe clean the base cabinets as well. I like to do this while I’m waiting for things like the wood glue to dry.
- Place drop cloths down below the cabinets.

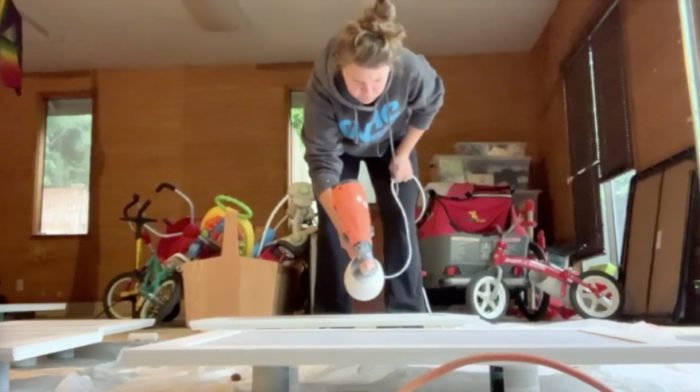
Prime The Cabinets:
- I usually do this with a paint brush and roller. You could also do this with a sprayer.
- Place the cabinet doors on something to raise them up a bit. I just used two leftover paint cans (even the mini sample containers will work) per cabinet door so they are really stable.
- Starting on the back of the cabinets, prime the cabinets using a foam roller. Allow to dry completely.
- Flip the cabinets so the fronts are facing up and prime making sure to get into all the grooves.
- Pro Tip: Do light coats of paint and primer. It’s better to do multiple light coats than to have thick, drippy coats of paint.
- Do another coat on both sides if needed.
- While the doors are drying, prime the cabinet bases.
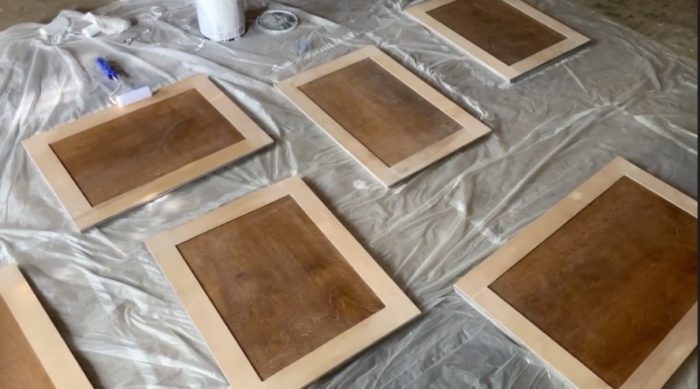
Paint The Cabinets:
- Following the directions on your paint sprayer, add in paint and water until you have the correct consistency.
- With the back of the doors facing up, give the doors a light coat of paint, spraying in even strokes. Allow the doors to completely dry before giving them a second coat.
- Once the backs are completely dry, flip them to the fronts and spray the cabinets in even strokes.
- Pro tip: Watch for any drips or weird bubbles. If you see any, take your foam roller and gently smooth them out.
- Allow to dry completely, and then do another coat, following the same procedure as before.
- Apply a third coat if needed. Allow to dry completely.
- While the cabinets doors are drying, Paint the base cabinets using a brush and foam roller. Allow to dry, and apply a second coat if needed.
Hang The Doors:
- Secure the hardware and hang the doors back up where they belong.
- If you want to add hardware, like pulls, you can.
- Gaze at your amazing creation and reflect on just how awesome you are.
Think about the 500 other projects you now want to complete since you are clearly a master craftsman.
I hope you enjoyed learning how to make shaker cabinet doors. If I can do it, so can you!
Pin It For Later
One Comment